Set Up a Custom Domain with your Ghost blog
Ghost is the freshly introduced blogging platform on the web. It rolled out in October 2013 and was available to limited audience that time. Now, it has unlocked access to the normal people who’ve requested an invite in the beginning.
After understanding Ghost basics, you might want to point your Ghost blog to a custom domain, for which you have to mess with DNS settings of your domain name. This small guide simplify things for you and lets you easily configure a TLD with your awesome Ghost blog.
Like other blogging platforms, ghost also provides you with a native blog URL on it’s subdomain. Lets say your Ghost blog URL is you.ghost.io.
Note: There are various online services that can be used to purchase a custom domain. I recommend NameCheap and Godaddy. You’ll see the use of names you.com and you.ghost.io many times in the tutorial. It’s just for demonstration, you are strictly advised to change them to your domain name and your ghost blog URL respectively.
Now, assuming you already own a custom domain, say it is you.com; you need to go to it’s DNS settings and create a CNAME record first.
Locating the DNS Settings
- Godaddy users may navigate to Account Manager, click Launch button next to domains, select your domain name, click the DNS Zone File tab and click the Edit button.
- NameCheap users should go to Manage Domains » Hosted Domains and click on your domain name.
- If you don’t know how to locate DNS settings, look at the help documents of your domain registrar or contact the support for the same.
Setting up the domain
There are three conditions of setting up your domain: you may want your blog to point to www.you.com OR blog.you.com OR only to you.com. Now, proceed and follow the next step as per your need:

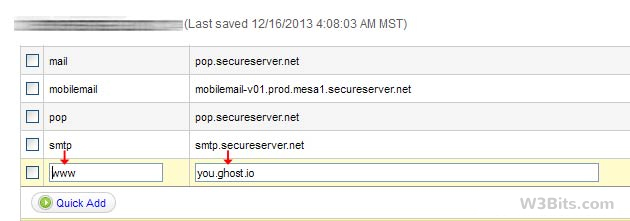
Tip: A CNAME record has two entries in general: a Host name value, and a Server IP value.
Case 1: If you want to point your blog to www.you.com, then add a CNAME record with Name as www and server IP value you.ghost.io.
OR
Case 2:If you want it to point to blog.you.com, then add a CNAME record with Name value blog and server IP value you.ghost.io.
OR
Case 3:If you want it to point at the root domain, i.e. you.com, add a CNAME record with Name value @ and server IP value you.ghost.io.
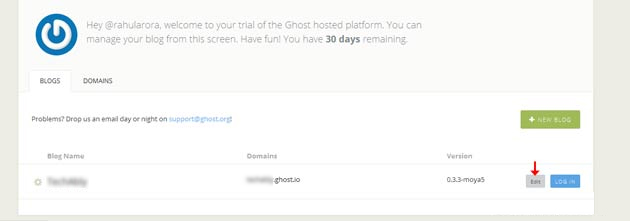
Save the changes. Hold on, we’re not done yet – we need to add our custom domain to our Ghost blog settings. To do that, navigate to My Blogs section and click the Edit button next to your respective Ghost blog.

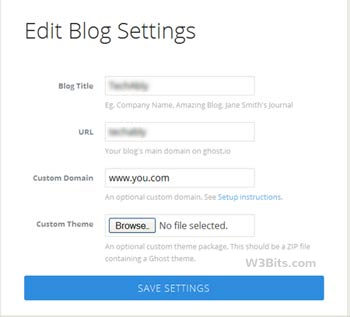
Now enter your domain name in the Custom Domain field. Note that you’ve to enter this value according to the DNS setup we just finished (i.e. if you have configured DNS settings for www.you.com, and same goes for the other two cases too). Click the Save Settings button. That’s it! We’re done (almost)!

There are chances that Ghost won’t detect the settings you’ve done with your domain name. In that case, you need to wait for sometime to get the changes properly propagate. Generally it takes few minutes to some hours to get the changes fully propagated.
After the propagation, try visiting your domain name; if you’ve followed the tutorial properly, you’ll see it loading your Ghost blog! That’s what you needed!