Icon system with SVG Sprites
A Guide to Create and Use SVG Sprites
Planning to switch to SVG for the graphic assets on your website? I guess SVG sprites is one of those things you should know then–which this guide is all about.
SVGs are around since 1998, but they got the proper attention in 2015. You might already know that using SVG is one of the hottest Web design trends since 2015 until the present.

Why use SVG?
Expanded as Scalable Vector Graphics, SVG is an XML-based vector image format with extended support for animation and coloring.
I can give you some best reasons to start using SVG, today. You should prefer SVGs over bitmaps and icon fonts, because:
- They are lightweight–very light in fact when compared to icon fonts and PNG graphics
- They have unlimited possibilities with coloring, sizing, and animation–way more than icon fonts.
- Modern web browsers fully support SVG
What are SVG Sprites?
A sprite is basically different graphics laid on one sheet, and you tweak your elements with CSS or JavaScript to show the appropriate graphic from that sheet.
If you remember those PNG sprites from 2005-2015, you already know what I’m talking about.
I ditched PNG when I heard of icon fonts which was hot stuff back in 2012-2013. Later on, I found it kinda stupid to load a plethora of icons I’m never gonna use on the website via an icon font.
Then only, SVGs came into the well-deserved limelight–everybody was talking about them in 2015-2016. Further in this article are the steps for creating quick and lightweight icon systems using SVG spritesheets.
Creating SVG Sprites
In my opinion, Adobe Illustrator is the best alternative to create SVG graphics for your use, later on we can mould them into one sprite and then discuss it’s usage.
Go ahead and create one just like I created the graphics below, and export them as SVG.
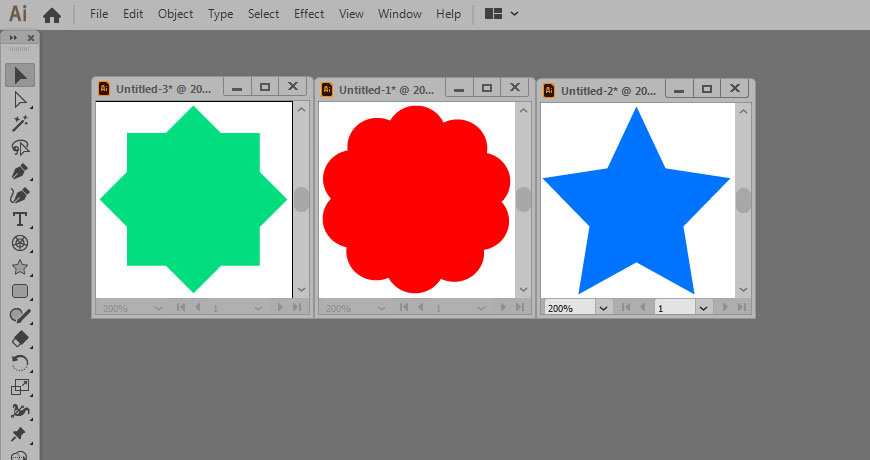
I created some sample graphics in Illustrator for demonstrating them to you as a SVG sprite.
Here is how the code for that illustrator exported SVG graphics looks like, notice the highlighted places in each of the three code segments given below.
Star.svg
<svg id="Layer_1" data-name="Layer 1" xmlns="http://www.w3.org/2000/svg" viewBox="0 0 95 95">
  <defs>
    <style>.cls-1{fill:#0074ff;}</style>
  </defs>
  <title>Star</title>
  <polygon class="cls-1" points="47.5 0 62.18 31.27 95 36.29 71.25 60.63 76.86 95 47.5 78.77 18.14 95 23.75 60.63 0 36.29 32.82 31.27 47.5 0"/>
</svg>
Flower.svg
<svg id="Layer_1" data-name="Layer 1" xmlns="http://www.w3.org/2000/svg" viewBox="0 0 95 95">
  <defs>
    <style>.cls-1{fill:red;fill-rule:evenodd;}</style>
  </defs>
  <title>Flower</title>
  <path class="cls-1" d="M96.9,36.75A14.87,14.87,0,0,0,85.62,26.54a14.39,14.39,0,0,0-5.57-14A15.44,15.44,0,0,0,63.68,11.2a15.27,15.27,0,0,0-27-1,15.47,15.47,0,0,0-15.36,1.3A14.43,14.43,0,0,0,15.16,25.2,14.93,14.93,0,0,0,3.48,35a14.29,14.29,0,0,0,3.3,14.62A14.3,14.3,0,0,0,3.19,64.15a14.89,14.89,0,0,0,11.48,10A14.41,14.41,0,0,0,20.52,88a15.42,15.42,0,0,0,15.34,1.59,15.28,15.28,0,0,0,26.49.51,15.42,15.42,0,0,0,15.38-1,14.43,14.43,0,0,0,6.41-13.61A15,15,0,0,0,96,65.92a14.31,14.31,0,0,0-3-14.69A14.31,14.31,0,0,0,96.9,36.75" transform="translate(-2.5 -2.5)"/>
</svg>
8 Point Star.svg
<svg id="Layer_1" data-name="Layer 1" xmlns="http://www.w3.org/2000/svg" viewBox="0 0 95 95">
  <defs>
    <style>.cls-1{fill:#00dd7e;}</style>
  </defs>
  <title>8 Point Star</title>
  <path class="cls-1" d="M83.59,63.91,97.5,50,83.59,36.09V16.41H63.91L50,2.5,36.09,16.41H16.41V36.09L2.5,50,16.41,63.91V83.59H36.09L50,97.5,63.91,83.59H83.59Z" transform="translate(-2.5 -2.5)"/>
</svg>
We are going to make use of the highlighted content in the above SVG code blocks in a separate template, which will be our final SVG sprite.
Final SVG Sprite template
Take a look at the SVG code below. We have combined all three graphics in one file, with the help of SVG’s <symbol> tag.
Take a note that in their individual files, each of the three graphics were held by the main <svg> tag–whereas after combining things, <symbol> is acting as the holder for each of the graphics.
<svg xmlns="http://www.w3.org/2000/svg" xmlns:xlink="http://www.w3.org/1999/xlink">

  <!-- ViewBox and Polygon taken from "Star.svg" -->
  <symbol id="icon-star" viewBox="0 0 95 95">
    <polygon points="47.5 0 62.18 31.27 95 36.29 71.25 60.63 76.86 95 47.5 78.77 18.14 95 23.75 60.63 0 36.29 32.82 31.27 47.5 0"/>
  </symbol>

  <!-- ViewBox and Polygon taken from "Flower.svg" -->
  <symbol id="icon-flower" viewBox="0 0 95 95">
    <path class="cls-1" d="M96.9,36.75A14.87,14.87,0,0,0,85.62,26.54a14.39,14.39,0,0,0-5.57-14A15.44,15.44,0,0,0,63.68,11.2a15.27,15.27,0,0,0-27-1,15.47,15.47,0,0,0-15.36,1.3A14.43,14.43,0,0,0,15.16,25.2,14.93,14.93,0,0,0,3.48,35a14.29,14.29,0,0,0,3.3,14.62A14.3,14.3,0,0,0,3.19,64.15a14.89,14.89,0,0,0,11.48,10A14.41,14.41,0,0,0,20.52,88a15.42,15.42,0,0,0,15.34,1.59,15.28,15.28,0,0,0,26.49.51,15.42,15.42,0,0,0,15.38-1,14.43,14.43,0,0,0,6.41-13.61A15,15,0,0,0,96,65.92a14.31,14.31,0,0,0-3-14.69A14.31,14.31,0,0,0,96.9,36.75" transform="translate(-2.5 -2.5)"/>
  </symbol>

  <!-- ViewBox and Polygon taken from "8 Point Star.svg" -->
  <symbol id="icon-8pt-star" viewBox="0 0 95 95">
    <path class="cls-1" d="M83.59,63.91,97.5,50,83.59,36.09V16.41H63.91L50,2.5,36.09,16.41H16.41V36.09L2.5,50,16.41,63.91V83.59H36.09L50,97.5,63.91,83.59H83.59Z" transform="translate(-2.5 -2.5)"/>
  </symbol>

</svg>
A couple of things to notice here:
- viewBox comes coded in the files exported by Illustrator, and basically defines the positioning and the dimension of our graphic.
- The fragment identifiers (
icon-star,icon-floweretc.) provided to the<symbol>tag help us further to locate the specific icon/graphic.
Save this file with SVG format, we are going to use it further in the tutorial.
<!-- viewBox="min-x, min-y, width, height" -->
<symbol viewBox="0 0 95 95">
  ...
</symbol>
You can use as many graphics as you want in the sprite template, it’s all up to you now.
Using the SVG sprite
Make sure to add proper path to the SVG sprite file, and use the fragment identifier specific to the SVG icon or symbol you want to display.
<svg class="icon icon--red">
  <use xlink:href="/path/to/sprite.svg#icon-star"></use>
</svg>
And that’s how you do it.
Creating SVG Sprite from Icon fonts
What about creating a sprite out of your favorite icon fonts like FontAwesome, LineIcons, Entypo and more?
Downloading, then installing font icons one-by-one on your computer, and then using illustrator to create SVG graphics for each icon separately would be a tedious task. And here comes IcoMoon as our saviour, which effortlessly convert SVG from Icon fonts for you.
- To start with IcoMoon, head over to the IcoMoon app and start adding icon packs that you want to get SVG icons from.Once you have some icon packs in your library, start selecting icons from the grid as shown below:

- After making selections, make sure you set the “Tiles (CSS Sprite)” option checked in the app preferences.

- Lastly, click the download button to export the required files and get them in a zipped archive.

- Extract the downloaded zipped archive and find the generated SVG file in the “sprite” folder inside.
This generated SVG sprite needs some improvement though. Just replace the nested <svg> tags with the <symbol> tags, remove the unnecessary information like height, width, x, and y attributes, and you are good to go.
Live Demo of IcoMoon SVG Sprite
Refer the above template to avoid any conflicts. Don’t forget to share your opinion, suggestions, and questions in comments. Cheers!